MMT Primary Mirror Cell -- Hardpoint Limits
The following is an overview of hardpoint limits, and in particular the
way to recover from being in one (or more). The following screenshot of the hardpoint
window will be useful to refer to during the introductory discussion.
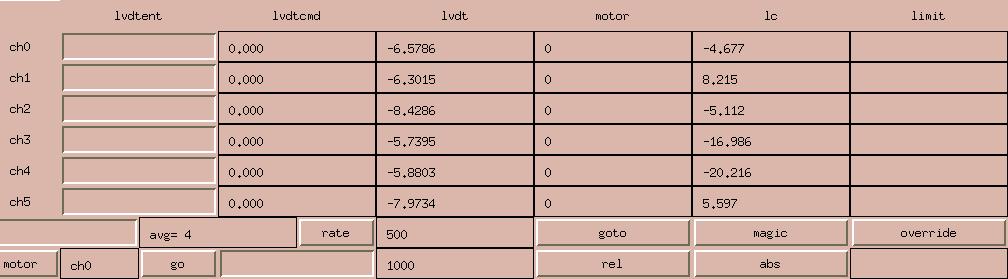
The column "limits" is where the limit status is displayed. If you are in a limit,
this will display "upper" or "lower", to tell you which limit you are in.
It can also display "broke" (or broken or "Both!") to indicate that both limit
status bits are asserted. This should be an impossible state, but it can (and has)
occured, and the explanation will follow.
Sign conventions and such
A positive count extends the hardpoint (moves out of a lower limit).
A negative count retracts the hardpoint (moves out of an upper limit).
10,000 motor pulses (counts) will move 1 mm.
Hardpoint numbering
Several inconsistent numbering systems have been used to label the hardpoints.
Hardpoints are numbered 0-5, corresponding to the electrical channels in the
hardware, i.e. motor 0 is the first channel on the ADC reading the harpoint loadcell
and lvdt, as well as the first group of bits on the PIO that sends pulses. You should
be able to identify the physical hardpoint in the cell from a label nearby that says
GUI-0 or something like that. The mechanical group had one or more other numbering schemes.
Hardpoint numbers increase clockwise as viewed from the sky. We have hardpoints
0 through 5 in pairs. 0/1 are at the north end of the cell. 2/3 are at the SE end,
and 4/5 are at the SW end. Pod 0 is at the north end, but towards the west,
1 is the next clockwise (viewed from the sky) and numbers increase clockwise.
This description, although awkward, should enable you to unambiguously locate
a hardpoint in the cell.
One other number scheme used these same numbers, except they called my number
0 number 6, thus getting 1-6. You are probably well off to forget I even mentioned
this, except that this is the convention used in the paper by Steve West that defines
the transformation matrices. In essence this just starts counting with 1, but
starts with my second hardpoint (which I call 1). Both schemes count clockwise
as viewed from the sky, but one starts counting one hardpoint ahead of the other.
Limit switches
There are 3 limit switches. Two are proximity switches ("prox switches") that provide
an upper and lower limit to motion, as well as limit status to software. The third
switch is a mechanical switch that opens if we manage to get beyond the upper prox limit.
This switch removes motor power, but does not provide any additional status information.
A side effect of removing power is that both prox switches will read as "in the limit"
yielding the "busted" status; so named because a status of being in both upper and lower
limits was viewed as impossible and must mean something is seriously broken.
Getting out of a limit
The process for getting out of a limit is somewhat tedious, but here is how the game
goes. You use the lower left part of this GUI, the bottom row in particular.
In the entry field to the right of the "go" button, you enter a number of motor
steps you would like to go, and hit return. The value you enter should then transfer
to the display field to the right (but no motion has happened yet). The "go" button
sends this many pulses to the selected motor when pressed. To repeat the move you just
hit go again. The motor you are fiddling
with is selected by repeatedly pressing the "motor" button. This will cycle through
motors 0-5 (corresponding to the labels on the above GUI, and also allows "all"
motors to be selected. In the screenshot shown, we are ready to move 1000 motor steps (0.1 mm)
on hardpoint 0 when the go button is clicked. Once you have entered the pulse count and picked the motor
you are almost ready to go. Before hitting the go button, you must override the limit
by clicking on the override button, when you do this, the background color on all of
the limit status fields goes to red to warn you that the override is active. After
approximately 30 seconds, the override is automatically cancelled, so you will
want to click "override" and then "go" without much delay between them.
Note that when in a limit, the direction of the move is forced by hardware to get you
out of the limit. If you make the wrong choice (such as performing a positive move
when in the upper limit), the hardpoint will back out of the limit till the limit
status clears, then the direction chosen by software will take over and back into the
limit you will go. This leads to a back and forth motion which gets you nowhere,
may very well be confusing, but is safe. All of this, except the confusion, is a design feature.
Choosing the correct sign will get you cleanly out of the limit.
Final hardware limit
A late addition made at the MMT was to add a final upper limit switch (there is no final
lower limit switch). If we somehow manage to move beyond the upper soft limit, we will
encounter this switch, which interrupts the 20 volt power to the stepper driver, making
further motion impossible. This also removes power from the circuitry that delivers
the upper/lower limit status to the software, and this causes a status of being in both
limits to be displayed. It is possible that the final switch engagement is almost
identical to the soft upper limit, in which case both upper limits are flagged, and
a status of "busted" will be displayed.
Also note that once the final upper limit switch is engaged, it can only be overridden
by removing a cell cover plate, finding, and pressing an override button that is located somewhere
inside the cell and near the hardpoint in question. For this reason it is desirable
that this final encounter be distinct from the soft limit encounter (the proximity switch),
because it is a giant hassle to perform this override. It is done this way because if we
are in the final upper limit, the mirror is in peril, and we want someone to be performing
a visual check of proper hardpoint motion while moving out of the limit.
Some information from a recent mirror raise
Around noon on 4-7-2008, we raised the mirror twice while zenith pointing.
This is the data from the second lift - after the mirror had been picked up and set down
once to ensure a nice calm starting point. Note that the lvdt values are given in millimeters
relative to the nominal up position (the "magic" position), so that when up, the nominal
lvdt position is all zeros. The absolute lvdt positions are also shown, as well as the motor
counts (10,000 per millimeter) needed to extend the hardpoints while lifting the mirror. It is
interesting to note that the motor counts are in all cases in excess of the motion shown
by the LVDTs. This probably indicates that we are pushing the motors hard and operating
near their stall speed and dropping some pulses. Note that the absolute lvdt zero point
is arbitrary, and may change when a hardpoint is serviced or a spare swapped in.
| Hardpoint |
Down-lvdt |
Down-lvdt(abs) |
Up-lvdt |
Up-lvdt(abs) |
Up, Motor counts |
| 0 |
-6.52 |
-7.55 |
0 |
-1.03 |
708305 |
| 1 |
-6.91 |
-9.88 |
0 |
-2.97 |
745998 |
| 2 |
-7.10 |
-9.30 |
0 |
-2.18 |
771720 |
| 3 |
-6.98 |
-7.93 |
0 |
-0.95 |
737753 |
| 4 |
-6.95 |
-7.29 |
0 |
-0.34 |
723659 |
| 5 |
-7.25 |
-9.90 |
0 |
-2.65 |
790190 |
Note that each hardpoint extends about 7 mm while moving the mirror from the down and parked position to the up and
operating position. Also note that a positive motor pulse count raises the mirror.