October 2, 2012
An unhappy note up front. My Pro Micro broke on the second day working with it.
The surface mount micro-USB connector is just not sturdy enough.
I think the only way to work with one of these is to mount it in a box or on
a board with a short pigtail to some larger USB connector.
Many people complain about this -- in the future I plan to avoid any Arduino
boards with micro-USB connectors.
What I do plan to do is to mount the pro-micro on a larger proto-board,
also mount a female USB-B connector on the same board nearby and carefully
solder a few wire-wrap wires to the heftier connector.
(I did this exact repair October 13, 2012, see below).
While I am on this theme, I should mention the Arduino Leonardo. The Leonardo is a full "classic size" Arduino, but with a ATmega32u4 chip like the Pro Micro. I would be enthused about it, if it had a nice hefty USB standard B connector, but no! It has a wimpy micro-USB. The insanity! What were they thinking? Hope they used lots of epoxy.
I plug my brand new Pro Micro into my Fedora 17 linux system (with Arduino 1.0.1) and see the following activity in /var/log/messages:
Oct 2 18:08:13 trona kernel: [333610.205020] usb 2-6: new full-speed USB device number 4 using ohci_hcd Oct 2 18:08:13 trona kernel: [333610.403966] usb 2-6: New USB device found, idVendor=1b4f, idProduct=9206 Oct 2 18:08:13 trona kernel: [333610.403971] usb 2-6: New USB device strings: Mfr=1, Product=2, SerialNumber=0 Oct 2 18:08:13 trona kernel: [333610.403974] usb 2-6: Product: USB IO Board Oct 2 18:08:13 trona kernel: [333610.403976] usb 2-6: Manufacturer: Unknown Oct 2 18:08:13 trona kernel: [333610.407060] cdc_acm 2-6:1.0: This device cannot do calls on its own. It is not a modem. Oct 2 18:08:13 trona kernel: [333610.407084] cdc_acm 2-6:1.0: ttyACM0: USB ACM device Oct 2 18:08:13 trona kernel: [333610.423029] input: Unknown USB IO Board as /devices/pci0000:00/0000:00:02.0/usb2/2-6/2-6:1.2/input/input6 Oct 2 18:08:13 trona kernel: [333610.423490] hid-generic 0003:1B4F:9206.0002: input,hidraw1: USB HID v1.01 Mouse [Unknown USB IO Board ] on usb-0000:00:02.0-6/input2 Oct 2 18:08:13 trona mtp-probe: checking bus 2, device 4: "/sys/devices/pci0000:00/0000:00:02.0/usb2/2-6" Oct 2 18:08:13 trona mtp-probe: bus: 2, device: 4 was not an MTP device Oct 2 18:08:13 trona dbus-daemon[796]: modem-manager[835]:(ttyACM0) opening serial port... Oct 2 18:08:13 trona modem-manager[835]: (ttyACM0) opening serial port... Oct 2 18:08:26 trona dbus-daemon[796]: modem-manager[835]: (ttyACM0) closing serial port... ....
yum erase NetworkManagerNow the thing to do is to find out if after a reboot, I have lost my static network setup.
I fire up the Arduino GUI (version 1.0.1).
I select the top choice under Tools->Serial_Port (/dev/ttyACM0).
I select the "Arduino Leonardo" under Tools->Board.
Then I select
I select File->Examples->Basic->Blink, hit the download button and things look good at first, but then I get the message:
Couldn't find a Leonardo on the selected port
from: processing.app.debug.AvrdudeUploader.uploadViaBootloader(AvrdudeUploader.java:150)
Too bad. I had hoped, since the Leonardo is based on the ATmega 32u4 chip, just like the Pro Micro, that this might work, but apparently I have more work to do.
cd sketchbook
mkdir hardware
cd hardware
unzip ../SF32u4_boards.zip
After this, start (or restart) the arduino GUI and you will see a longer list of boards, including the Pro Micro. Above all else, you will now be able to download your sketch. It was at this point that the micro-USB connector got ripped off of my board, so you will have to stand by till I manage a repair.
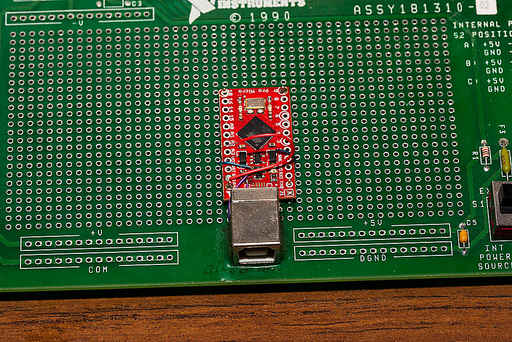
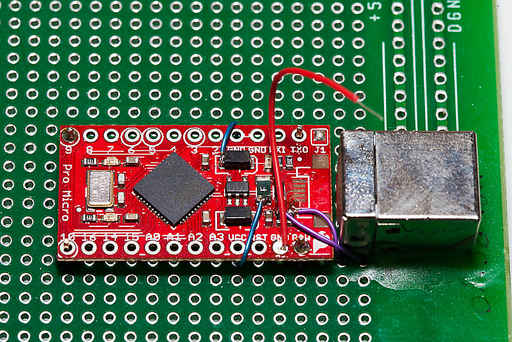
As you can see, after this, I have a physically stout setup on a roomy piece of proto-board. The red wire you can see in the second photo is connected to ground and serves as a reset switch by touching it against the RESET pin.
With the files added to the Arduino GUI as mentioned above, the Arduino GUI recognizes it as a "Sparkfun Pro Micro 5V/16" on "/dev/ttyACM0" and when I pick out the blink demo from the basic example collection, it happily downloads it to the device, but no blinking is taking place. This is not a big surprise, since nobody ever said there was an LED connected to the moral equivalent of Arduino Pin 13 (in fact there is no pin 13). But since I have the arduino GUI set up to tell me as much as it is willing to about what it is doing, I can harvest some information:
avr-gcc -c -g -Os -Wall -ffunction-sections -fdata-sections -mmcu=atmega32u4 -DF_CPU=16000000L -MMD -DUSB_VID=0x1B4F -DUSB_PID=0x9206 -DARDUINO=101 -I/home/tom/sketchbook/hardware/SF32u4_boards/cores/arduino -I/home/tom/sketchbook/hardware/SF32u4_boards/variants/promicro /home/tom/sketchbook/hardware/SF32u4_boards/cores/arduino/wiring.c -o /tmp/build8359288423058083928.tmp/wiring.c.o

avr-g++ -c -g -Os -Wall -fno-exceptions -ffunction-sections -fdata-sections -mmcu=atmega32u4 -DF_CPU=16000000L -MMD -DUSB_VID=0x1B4F -DUSB_PID=0x9206 -DARDUINO=101 -I/home/tom/sketchbook/hardware/SF32u4_boards/cores/arduino -I/home/tom/sketchbook/hardware/SF32u4_boards/variants/promicro /tmp/build8818196162213515972.tmp/Blink.cpp -o /tmp/build8818196162213515972.tmp/Blink.cpp.o

avr-gcc -Os -Wl,--gc-sections -mmcu=atmega32u4 -o /tmp/build8818196162213515972.tmp/Blink.cpp.elf /tmp/build8818196162213515972.tmp/Blink.cpp.o /tmp/build8818196162213515972.tmp/core.a -L/tmp/build8818196162213515972.tmp -lm

avr-objcopy -O ihex -j .eeprom --set-section-flags=.eeprom=alloc,load --no-change-warnings --change-section-lma .eeprom=0 /tmp/build8818196162213515972.tmp/Blink.cpp.elf /tmp/build8818196162213515972.tmp/Blink.cpp.eep

avr-objcopy -O ihex -R .eeprom /tmp/build8818196162213515972.tmp/Blink.cpp.elf /tmp/build8818196162213515972.tmp/Blink.cpp.hex

avrdude -v -v -v -v -patmega32u4 -cavr109 -P/dev/ttyACM0 -b57600 -D -Uflash:w:/tmp/build8818196162213515972.tmp/Blink.cpp.hex:i
Here are some potentially informative messages from avrdude:
avrdude: Version 5.11.1, compiled on Jan 22 2012 at 19:19:32
         Using Port                    : /dev/ttyACM0
         Using Programmer              : avr109
         Overriding Baud Rate          : 57600
         AVR Part                      : ATmega32U4
         Chip Erase delay              : 9000 us
         PAGEL                         : PD7
         BS2                           : PA0
         RESET disposition             : dedicated
         RETRY pulse                   : SCK
         serial program mode           : yes
         parallel program mode         : yes
         Timeout                       : 200
         StabDelay                     : 100
         CmdexeDelay                   : 25
         SyncLoops                     : 32
         ByteDelay                     : 0
         PollIndex                     : 3
         PollValue                     : 0x53
         Memory Detail                 :

                                  Block Poll               Page                       Polled
           Memory Type Mode Delay Size  Indx Paged  Size   Size #Pages MinW  MaxW   ReadBack
           ----------- ---- ----- ----- ---- ------ ------ ---- ------ ----- ----- ---------
           eeprom        65    10     8    0 no       1024    8      0  9000  9000 0x00 0x00
                                  Block Poll               Page                       Polled
           Memory Type Mode Delay Size  Indx Paged  Size   Size #Pages MinW  MaxW   ReadBack
           ----------- ---- ----- ----- ---- ------ ------ ---- ------ ----- ----- ---------
           flash         65     6   128    0 yes     32768  128    256  4500  4500 0x00 0x00
                                  Block Poll               Page                       Polled
           Memory Type Mode Delay Size  Indx Paged  Size   Size #Pages MinW  MaxW   ReadBack
           ----------- ---- ----- ----- ---- ------ ------ ---- ------ ----- ----- ---------
           lfuse          0     0     0    0 no          1    0      0  9000  9000 0x00 0x00
                                  Block Poll               Page                       Polled
           Memory Type Mode Delay Size  Indx Paged  Size   Size #Pages MinW  MaxW   ReadBack
           ----------- ---- ----- ----- ---- ------ ------ ---- ------ ----- ----- ---------
           hfuse          0     0     0    0 no          1    0      0  9000  9000 0x00 0x00
                                  Block Poll               Page                       Polled
           Memory Type Mode Delay Size  Indx Paged  Size   Size #Pages MinW  MaxW   ReadBack
           ----------- ---- ----- ----- ---- ------ ------ ---- ------ ----- ----- ---------
           efuse          0     0     0    0 no          1    0      0  9000  9000 0x00 0x00
                                  Block Poll               Page                       Polled
           Memory Type Mode Delay Size  Indx Paged  Size   Size #Pages MinW  MaxW   ReadBack
           ----------- ---- ----- ----- ---- ------ ------ ---- ------ ----- ----- ---------
           lock           0     0     0    0 no          1    0      0  9000  9000 0x00 0x00
                                  Block Poll               Page                       Polled
           Memory Type Mode Delay Size  Indx Paged  Size   Size #Pages MinW  MaxW   ReadBack
           ----------- ---- ----- ----- ---- ------ ------ ---- ------ ----- ----- ---------
           calibration    0     0     0    0 no          1    0      0     0     0 0x00 0x00
                                  Block Poll               Page                       Polled
           Memory Type Mode Delay Size  Indx Paged  Size   Size #Pages MinW  MaxW   ReadBack
           ----------- ---- ----- ----- ---- ------ ------ ---- ------ ----- ----- ---------
           signature      0     0     0    0 no          3    0      0     0     0 0x00 0x00

         Programmer Type : butterfly
         Description     : Atmel AppNote AVR109 Boot Loader

Found programmer: Id = "CATERIN"; type = S
    Software Version = 1.0; No Hardware Version given.
Programmer supports auto addr increment.
Programmer supports buffered memory access with buffersize=128 bytes.
Programmer supports the following devices:
    Device code: 0x44
avrdude: devcode selected: 0x44
avrdude: AVR device initialized and ready to accept instructions

avrdude: Device signature = 0x1e9587
On the Pro Micro, we have a blinkable LED on PD5. PB5 is now "D9" and is not connected to anything.
A side note here about pins and how they are labelled. People who work in the Arduino GUI, deal with Arduino pin numbers such a "13" and never care about details like the fact that the AVR ATmega328 has a port B, and bit 5 is wired to the thing labelled "13" on the edge of the card. They just talk to "13" in software and find a connector labelled "13" on the edge of the card and life is good.
In fact, if you read the "getting started" note on the Sparkfun site, and bypass all the discussion about setting up Windows USB drivers, you will find that they tell you right up front (or actually, way at the end), that the stock blink demo won't blink.
The deal is that there are two software controllable LED's on the Pro-Micro that they label Tx and Rx. You can expect to see them blink when software gets uploaded. The Rx LED (Yellow) can be controlled via Arduino pin 17 (it is connected to PB0). The Tx LED (Green) has no defined Arduino pin (it is connected to PD5).
You would never know which LED is which by looking at the board (unless they were lit). The Yellow "Rx" is near the silkscreened "7". The Green "Tx" is near the silkscreened "14". The ports that drive these LED's are dedicated to doing so and are not routed to any of the pins along the edge of the board.
Connecting to programmer: .avrdude: Send: . [1b]
avrdude: Send: S [53]
avrdude: ser_recv(): programmer is not responding
avrdude: butterfly_recv(): programmer is not responding
The curious fact is that the arduino GUI has no trouble uploading an image using what would appear to be the same avrdude line. A closer look at the verbose output from the arduino GUI shows that the arduino GUI does an open/close of the USB port just before firing up avrdude, presumably to cause a reset of the 32u4.
avr-objcopy -O ihex -R .eeprom /tmp/build8519944806571344504.tmp/Blink.cpp.elf /tmp/build8519944806571344504.tmp/Blink.cpp.hex
Binary sketch size: 4,784 bytes (of a 28,672 byte maximum)
Forcing reset using 1200bps open/close on port /dev/ttyACM0
PORTS {/dev/ttyACM0, /dev/ttyS0, } / {/dev/ttyACM0, /dev/ttyS0, } => {}
PORTS {/dev/ttyACM0, /dev/ttyS0, } / {/dev/ttyACM0, /dev/ttyS0, } => {}
Uploading using selected port: /dev/ttyACM0
avrdude -v -v -v -v -patmega32u4 -cavr109 -P/dev/ttyACM0 -b57600 -D -Uflash:w:/tmp/build8519944806571344504.tmp/Blink.cpp.hex:i
Just for the record, when I do an upload to the Arduino UNO and take a close look
at the verbose output, there is no such open/close mentioned.
It turns out this is a documented feature of the Caterina bootloader used in the ATmega32u4 based "Arduino Leonardo" and other ATmega32u4 based devices. Since such devices don't have a USB to serial chip that can manipulate the DTR line to cause a reset (such as is done on the Arduino Uno), something else must be done (if you want a software reset). The "trick" of setting the baud rate to 1200 and then opening and closing a connection is what somebody decided on.
The arduino GUI does this from Java before launching avrdude, the relevant code is in arduino-1.0.1/app/src/processing/app/debug/AvrdudeUploader.java as follows:
    // need to do a little dance for Leonardo and derivatives:
    // open then close the port at the magic baudrate (usually 1200 bps) first
    // to signal to the sketch that it should reset into bootloader. after doing
    // this wait a moment for the bootloader to enumerate. On Windows, also must
    // deal with the fact that the COM port number changes from bootloader to
    // sketch.
    if (boardPreferences.get("bootloader.path").equals("caterina")) {
      String caterinaUploadPort = null;
      try {
        // Toggle 1200 bps on selected serial port to force board reset.
        List before = Serial.list();
        if (before.contains(uploadPort)) {
          if (verbose || Preferences.getBoolean("upload.verbose"))
            System.out
                .println(_("Forcing reset using 1200bps open/close on port ")
                    + uploadPort);
          Serial.touchPort(uploadPort, 1200);

          // Scanning for available ports seems to open the port or
          // otherwise assert DTR, which would cancel the WDT reset if
          // it happened within 250 ms.  So we wait until the reset should
          // have already occured before we start scanning.
          if (!Base.isMacOS()) Thread.sleep(300);
        }
In any event, I added these lines to my Makefile:
load:           blink.hex
        stty 1200 /dev/ttyACM0
        sleep 1
        avrdude -p atmega32u4 -c avr109 -P /dev/ttyACM0 -b 57600 -D -U flash:w:blink.hex:i
This worked beautifully once I added the sleep, the blink demo downloaded and
the green Tx LED (controlled by PD5) began blinking - just as it should.
Some people have written a short python script to perform the reset.
I was thinking of using perl if some simple commands like the above hadn't
done the job.
What this boils down to is that with my application running, the Pro Micro is no longer a USB device. This pretty much makes sense given that my application is running instead of the bootloader and is only 200 bytes or so of code. Nobody is home to respond with Vendor and Device ID's and all of that.
This didn't happen when I downloaded the standard blink demo from the arduino GUI, but that links in a dozen files or so (including a bunch of USB stuff). Apparently that extra stuff is what makes the Pro Micro identify itself to the USB bus after getting plugged in.
Looks like I will have to figure out a way to wire up a reset button to try the "double tap" scheme that is mentioned in this snippet from the Sparkfun site:
As of September 17, 2012 these boards (Pro Micro 5V/16) will be shipping with a new version of the Caterina bootloader developed by Arduino for the Leonardo, which incorporates a couple of bug fixes and enhancements. First, the code has been modified to compile differently for 8 and 16MHz systems.Most significantly, though, the behavior of the bootloader on reset has been changed. By default, the Caterina bootloader remains in bootloader mode for 8 seconds after an external reset, to allow the user a chance to upload code should the previously uploaded code disable the USB functionality. We found that to be excessive when resetting the device during program development, so we replaced that with a "double tap" function. To override the main code and stay in the bootloader for 8 seconds, press the reset button twice in quick succession.
The real humor in the above lies in the fact that the Pro-Micro has no reset button.
However, what I do is to solder a short piece of wire-wrap wire to the ground "pin" on the edge of the board and touch it to the reset "pin". If I touch it once, I get about 1 second of delay before my program resumes running. But if I touch the reset "pin" twice, I get the 8 seconds advertised, my host computer sees the USB device, and sets up /dev/ttyACM0 again and I can download code.
Another odd thing, after the download, the code does not run. I need to reset the 32u4 to get the code running. Now that I have my handy reset wire, that is the simplest way to do it, but of course unplugging and replugging the USB connector works also. It seems like when the arduino GUI downloaded code, it started it running. In fact, what I see is that when I double tap the board and let the 8 seconds run out, things end up hung. But if I then give a single tap reset, everything starts up fine.
It would be interesting to try the 8 second double tap trick with the Arduino GUI, but it is hell on wheels to do so. The GUI does not offer you /dev/ttyACM0 in the menu if that port does not exist when it starts up, and it will be quite a race to double tap the board and start the gui, select the blink demo and download it in 8 seconds.
"2" -- PD1
"3" -- PD0
"4" -- PD4
"5" -- PD6
"6" -- PD7
"7" -- PE6
"8" -- PB4
"9" -- PB5
"10" -- PB6
"15" -- PB2 (MOSI)
"14" -- PB3 (MISO)
"16" -- PB1 (SCK)
"A0" -- PF7
"A1" -- PF6
"A2" -- PF5
"A3" -- PF4
Tom's Computer Info / tom@mmto.org