All of these things are important elements of a project I want to put together - namely a way to carry digital topographic maps into the field. I need to have all the maps in the device because I go to remote places where cell networks (never mind WiFi) do not and likely will not ever reach. I want an all solid state device that will resist being bounced around in a vehicle being driven over rough roads. I want something on the order of an 8 hour battery life, along with a large display (the 2.5 inch displays on portable GPS receivers do not meet the requirements for this project).
I have let over a year go by without doing anything about this project, but now have a trip planned where having this done would be ideal. The trip is 5 weeks away (April 15, 2013) - a reasonable timeframe if I can focus on getting it done. These pages are intended to be a "blog" of sorts - a chronological logbook of my progress as I work through this project.
I followed the advice on the Google Android Developer site, and downloaded the file adt-bundle-linux-x86_64.zip. This is about 419 megabytes of stuff.
The claim is that it will give me:
I unzip it to /u1/adt-bundle-linux-x86_64 on my system, and make a symbolic link to it I call /u1/adt-bundle. Within it are two directories, "sdk" and "eclipse".
The advice is to "open the directory /u1/adt-bundle/eclipse and then run the eclipse executable in that directory. I am not sure what they mean by "open the directory". (I guess they are trying to give platform independent instructions here, which leads to ambiguity). I tell it I want my workspace to be /home/tom/Android -- then I get the error "Could not find SDK folder /opt/androidSDK". Now on my system, the file /opt/androidSDK is an old (and broken) link to /u1/android/android-sdk-linux from a prior attempt to set up android development. I delete this link and still get the same error. I then follow the dialog, open the preference gadget, and tell it that the SDK location is /u1/adt-bundle/sdk and things seem cool now.
I will be honest that I am somewhat concerned about using the android bundle on my system. I already have an eclipse executable in /usr/bin/eclipse (which is on my path) that I installed as a Fedora package. Hopefully the eclipse in the android bundle can keep itself in its own world.
It doesn't seem to matter whether I do "cd /u1/adt-bundle/eclipse; ./eclipse" or if I give the full path "/u1/adt-bundle/eclipse/eclipse". I am putting a short script "adt" in my /home/tom/bin directory which does the second of these (and it seems to work).
Just for the record, the java I am running seems to be:
 javac -version
 javac 1.7.0_09
Also for the record, I note that the bundle is set up for Android 4.2 (Jelly Bean).
There seems to be nothing more beyond unzipping the bundle to get it installed (that and setting up a shortcut to launch eclipse), so the next step is to give it a try. I am going to follow the Android developer training plan set up by Google, which starts with the traditional "hello world" application:
I launch eclipse, and from the menu bar:
File->New->Android ApplicationI enter "My First App" in the first entry field and change the package name to org.mmto.myfirstapp. I click next and take defaults until I get to the "activity" screen, where I select Blank Activity. On the final screen, I take the defaults and click Finish.
Apparently selecting "My First App" selects a sample demo that already is typing "Hello World", so I don't have to do anything really. I certainly have not entered any java or xml code. I am heartened to see that it is possible to set up the Android application scaffolding using command line tools and bypass Eclipse if I want to, and I will take some time later to look into this (they key tools are "ant" and "adb").
My Android device is a Motorola Xoom (non-cellular) MZ604. It requires a micro USB cable (to connect to my development machine. I have a USB 2.0 A-male to Micro-B Cable 6 feet long that I bought via Amazon some time ago (I bought two while I was at it), otherwise I would be wasting time running off to buy a cable. When I plug it in and watch /var/log/messages, I see:
 usb 1-6: new high-speed USB device number 3 using ehci_hcd
 usb 1-6: New USB device found, idVendor=22b8, idProduct=70a8
 usb 1-6: New USB device strings: Mfr=2, Product=3, SerialNumber=4
 usb 1-6: Product: MZ604
 usb 1-6: Manufacturer: Motorola
 usb 1-6: SerialNumber: 0380624640e04217
I am told I need to enable USB debugging on my device. I click on the lower right corner of the screen, then click again to get a bigger menu that includes "Settings" at the bottom. Near the bottom of the settings I see "Developer options", but within that everything except "take bug report" is greyed out. At this point, this is a show stopper.
It only took two hours (but all that searching and hair pulling allowed me to learn a bunch of stuff), but now I have the answer. In the uppermost right corner of the screen is a pair of buttons on/off -- click "on" and all the settings get activated and I can click the box to enable USB debugging.
Just for the record, my Xoom is running Android 4.1.2, Linux kernel 2.6.39.4 built on September 10, 2012 - Build number JZ054K.
And for the record, my screen measures 5.5 by 8.5 inches. They call this a 10.1 inch display (measuring on the diagonal). It has a native resolution of 1280 by 800 pixels.
And a short history of my Xoom. I bought it as a recertified unit in December of 2011. It shipped with Android 3.2 (Honeycomb), but as soon as I plugged it in almost it upgraded itself (over the wifi connection) to something newer. It has upgraded itself several times since then (I have never initiated an upgrade myself). It ran a 4.0 version (Ice Cream Sandwich) for a while, and is now (March, 2013) running Android 4.1.2 (Jelly Bean). Note that 4.1 is Jelly Bean, API level 16. Current Android development is at 4.2 which is Jelly Bean, API level 17. The next version (Key Lime Pie) is expected by summer of 2013. The word for the Xoom is that (as of November, 2012) it has officially been removed from Android 4.2 AOSP (Android Open Source Project), which means that there will be no official over the air update.
Back to running the hello world application on my Xoom. I have it hooked up with the USB cable and now have USB debugging enabled. I open up Eclipse ADT and on the left side select my project (an important step that I was missing at first). Then on the menu bar I select Run --> Run as --> Android Application and I get a dialog that allows me to select my Xoom as a target option (wow, this is promising!). And voila, the hello world application is running on my tablet. No icon - the application does not seem to get installed on the tablet by doing this.
The next trick is to set up a virtual device to test with. I fire up the AVD manager, and click the "New" button. I create "MyXoom" as a 10.1 inch 1280 by 800 device with an SD card. It is targetting Android 4.2 (it remains to be seen if this is a problem). I select this target device, start, and launch it, this gives me an emulated tablet screen on my desktop display.
This is miserably slow (I was warned about this). In fact it takes several minutes, maybe as many as 10 to get the emulator fully up and running. I was totally confused by trying to get the emulator to respond to mouse clicks while it was still in the process of getting its act together. The tutorial says to unlock the screen before trying to download the application. This is a big clue -- if there is nothing to unlock, then the emulator is still not ready.
As you might expect there is lots of discussion online about how slow this is and all kinds of suggestions about how to speed it up. One key piece of advice I have seen is to never close the emulator once it starts up, but rather to keep reusing a started emulator. Start times on the order of 15 minutes are mentioned, but some people get this down to under 5 minutes! The emulator start time seems to be the worst of it. Once it gets up and running (give it at least 10 minutes on my system), applications can be loaded into it in a reasonable time, but real hardware is far far better.
The tutorial now has us editing XML files that specify the application layout (not writing a line of Java yet!!). We edit res/layout/activity_main.xml and res/values/strings.xml to install a text entry field
All this is fine, but feels a lot like the ruby on rails tutorials I have worked through; lots of jumping around between directories and editing files that I do not fully understand. But it works, and I am getting a taste of the flavor of the whole thing, which is sufficient for now. Also, I am pleased to find that I can just use the vi editor alongside of eclipse to work on files without problems.
Finally the tutorial has us writing some java. We modify the already generated template code in src/org/mmto/myfirstapp/MainActivity.java and then use eclipse to generate a new class in src/org/mmto/myfirstapp/DisplayMessageActivity.java which we then modify. This actually is working out OK. I can use vi outside of eclipse, but use eclipse to show me errors (which works out nicely), as well as to download to the Xoom.
At this point, I am done for the day and have finished the "Building my first App" on the Google getting started web page tutorial.
Another highly recommended tutorial is:
Also, because I find print books an effective way to learn, I ordered the book:As I have noted, I have had no problems using the vi editor right alongside of eclipse. This is not the handiest thing though, and in particular eclipse promises to afford a much handier way of navigating around the android directory structure. It is possible to configure eclipse so that its built in editor acts a lot like "vi". The way to do this is to use an eclipse plugin, and there are several to choose from. Two recommended commercial ones are "viable" and "viplugin". A plugin called Vrapper is recommended by many. It is open source and has a toggle switch that activates vi key bindings, which is a feature some people really like. This explains how to install it and get started.
I decided to go through the game tutorial on the XDA-developers site.
"XDA" by the way is the name of some phone that ran a microsoft based
operating system. The "XDA" site has expanded far beyond that origin
and seems to be a major center for android related information.
The game tutorial is covering a lot of basic Java programming
(as well as just basic programming all around), so I have been able
to go through the first "11 day" unit in a morning.
Nothing Android specific yet.
The big benefit, apart from a Java warm up,
is getting better acquainted with Eclipse.
Some useful tidbits learned:
Now using Eclipse with "vi" style keystrokes available, I am quite liking it. And the Control-Space thing works quite nicely. When you double click on the thing you like in the menu it fills it in for you, and will generate a lot of extra code (even a set of stub methods when you extend an interface for example). Also, the eclipse editor (with vi enhanced) will obey the mouse, which is very nice. One thing to watch out for is that when you do an insert and paste something - the paste happens at the mouse location. Typing Escape and u to undo saves the day though. So far I have not found any vi command that has not been there. Some people complain that the Vrapper plugin does not support regular expressions, but I use these so rarely in vi that I have yet to miss them.
On with the second unit of the tutorial. I was concerned that the tutorial instructs me to set up a java applet, but it turns out this is no liability as the run button in Eclipse launches it with no extra effort on my part.
And a random note about units in the Android world:
Note also that the (0,0) point of the Android screen is the upper left.
Another amazing Eclipse trick. Click on white space outside of the editor window. Select "Source", then "Generate Setters and Getters" and it adds a flock of accessor methods to your class for all private variables. It offers you a dialog so you can choose to set all of them or select which you like.
I had a lot of trouble getting the images that the tutorial instructs you to place into src/data to appear. It turns out that when Eclipse does the build, it copies these into bin/data (it also is placing compiled java into bin/kiloboltgame). Apparently everything under src is going to get mapped to bin by some set of rules. I sometimes had to select the data folder and do a File --> Refresh. I also changed the call to getDocumentBase(); to getCodeBase(); in the source (which seems like the right thing to do).
Maybe you are wondering whether it is worth all the trouble going through a game writing tutorial. As I am doing it, I realize that a lot of what I do with my topo map software is like what is being done in the games. I plaster images on the screen with the appropriate calls, and respond to various events to move these images and to change sizes. So the nature of the programming is quite appropriate. Also one of the greatest benefits is just getting road time with eclipse.
I have made it through Unit 1 and am about half way through Unit 2. What I may do is to skip to Unit 4 (which gets into porting the game to the Android) otherwise I could spend days honing my Java game writing skills.
Some things I am learning:
A thought that is coming into focus as I have been following the Java game writing tutorial is that I can do a lot of Java development and debugging in the native Java environment (which is quite efficient and responsive), before investing the effort to port the code to the Android.
Now, let's get the Android development system set up on my machine at work, and this time not using the adt-bundle.
 javac -version
 javac 1.7.0_09

 ls -l /etc/alternatives/javac
 javac -> /usr/lib/jvm/java-1.7.0-openjdk.x86_64/bin/javac
This is openJDK, not the "official" sun/oracle java. I will leave this be and see if any problems arise.
This is always terribly slow. While it is grinding away, I will just reiterate my complaint that every significant piece of Java based software (Eclipse, the Arduino IDE, the Android virtual device) are horrible dog slow turkeys. OK, it is finally up and running now. I see the "Welcome to Android Development" telling me I am on the right track behind a pop up that says it doesn't know where to find the Android SDK.
I select "Use existing SDKs" and enter /u1/android-sdk-linux. Now it tells me the SDK Platform Tools component is missing and I should use the SDK Manager to install it (this is expected). It offers to launch this for me (and I let it), but should I ever want to launch it by hand, I can run "/u1/android-sdk-linux/tools/android sdk".
I select all tools, the latest Android (4.2.2), Android 4.1.2 (since the Xoom runs that), and all the extras. It wants to install 25 packages and delete one. I click the button that tells me this, accept a license, and away it goes. It goes quite fast, but I am on a very fast connection at the University. It finishes telling me it has installed 21 package. I have to install the 4 extra packages next in a separate step. And now 2 more MIPS packages in another step (a different license apparently). And lastly it wants to delete one package (the SDK tools, revision 21.1), I do this, but am not sure it was such a good idea (see below) as it deletes the "android" executable that I need to run the SDK manager.
/u1/android-sdk-linux//tools/emulator:
error while loading shared libraries:
libstdc++.so.6: wrong ELF class: ELFCLASS64
It doesn't like this 64 bit library (there was indeed a warning about needing to run 32 bit executables). I wonder why I didn't get this error on my home machine? I will just install the 32 bit flavor of this library by doing:
yum install libstdc++.i686That gets the AVD emulator going, but a little later I get:
[2013-03-07 14:21:11 - MyFirstApp] /u1/android-sdk-linux/platform-tools/aapt:
error while loading shared libraries:
libz.so.1: wrong ELF class: ELFCLASS64
So I install more 32 bit libraries. In addition to "zlibs", I install some others (based on recommendations given by others going down this path).
yum -y install zlib.i686
yum -y install libXrender.i686
yum -y install libXext.i686
yum -y install fontconfig.i686
I was not able to install the 32 bit "fontconfig" due to some nasty yum issue, but perhaps I can burn that bridge if I ever come to it. One fellow recommended the following brute force approach to get every imaginable 32 bit library on your machine (I have not done this, but just might if I continue to trip over missing libraries).
yum -y install --skip-broken glibc.i686 arts.i686 audiofile.i686 bzip2-libs.i686 cairo.i686 cyrus-sasl-lib.i686 dbus-libs.i686 directfb.i686 esound-libs.i686 fltk.i686 freeglut.i686 gtk2.i686 hal-libs.i686 imlib.i686 lcms-libs.i686 lesstif.i686 libacl.i686 libao.i686 libattr.i686 libcap.i686 libdrm.i686 libexif.i686 libgnomecanvas.i686 libICE.i686 libieee1284.i686 libsigc++20.i686 libSM.i686 libtool-ltdl.i686 libusb.i686 libwmf.i686 libwmf-lite.i686 libX11.i686 libXau.i686 libXaw.i686 libXcomposite.i686 libXdamage.i686 libXdmcp.i686 libXext.i686 libXfixes.i686 libxkbfile.i686 libxml2.i686 libXmu.i686 libXp.i686 libXpm.i686 libXScrnSaver.i686 libxslt.i686 libXt.i686 libXtst.i686 libXv.i686 libXxf86vm.i686 lzo.i686 mesa-libGL.i686 mesa-libGLU.i686 nas-libs.i686 nss_ldap.i686 cdk.i686 openldap.i686 pam.i686 popt.i686 pulseaudio-libs.i686 sane-backends-libs-gphoto2.i686 sane-backends-libs.i686 SDL.i686 svgalib.i686 unixODBC.i686 zlib.i686 compat-expat1.i686 compat-libstdc++-33.i686 openal-soft.i686 alsa-oss-libs.i686 redhat-lsb.i686 alsa-plugins-pulseaudio.i686 alsa-plugins-oss.i686 alsa-lib.i686 nspluginwrapper.i686 libXv.i686 libXScrnSaver.i686 qt.i686 qt-x11.i686 pulseaudio-libs.i686 pulseaudio-libs-glib2.i686 alsa-plugins-pulseaudio.i686
I was getting supposed syntax errors, missing methods and java variables. All this resolved itself when I installed the missing 32 bit libraries, much to my surprise. I was beginning to think that the ADT-bundle was special in some way.
When I clicked the "Run" button to load my application into the AVD and run it, I kept getting the following error:
The selection did not contain any resources that can run on a serverI am pretty much convinced that this was because of the insanely long start up time for the AVD and the impossibility of knowing when it is actually ready to be used. It really does take on the order of 10 minutes or more to start on the machines I use (poor little dual core 2 Ghz 64 bit processors - yes I am being sarcastic).
By the way DDMS stands for Dalvik Debug Monitoring Service, which is part of the ADT setup. Also, "SMS" stands for "Short Messaging Service", which is just good old text messages. ADB is Android Debug Bridge (not the old assembly debugger I knew and loved).
Also, to learn more about Eclipse, you can restore the Welcome page by clicking on Help --> Welcome.
The first two lessons in Unit 4 deal with setting up the development system. The method recommended to check the java version is to start eclipse and click Window --> Preferences --> Java --> Compiler (which shows a compliance level of 1.7 -- which is fine). The tutorial recommends using the ADT bundle, which is a sensible approach.
I am missing the DDMS button he talks about in the upper right. It turns out this is just a shortcut to the DDMS perspective, which you can get via Window --> Open Perspective --> Other --> DDMS (which causes the shortcut button to appear).
A trivia item. Android releases are named after desserts, but in alphabetical order.
I really should create another AVD with a smaller screen size (he recommends a Galaxy Nexus with a 720x1280 screen and 1024K of RAM). He also enables snapshot as it lets the device start up the "same as last time", which speeds things up.
Note that when I click on the AndroidManifext.xml file, it presents me with a nice GUI with entry fields to allow me to screw with this file. This is nice. I wonder if Eclipse will do this for all the xml files that pop up?
The Game Tutorial guy (James Cho) says that he got much of what he is teaching from the following book, which he recommends. Reviewers say that the Android 4 claim in the title is baloney and that it is the same old Android 2.2 book with a new title and some misprints inside.
Back to the game tutorial -- I dutifully follow his building of the framework interface.
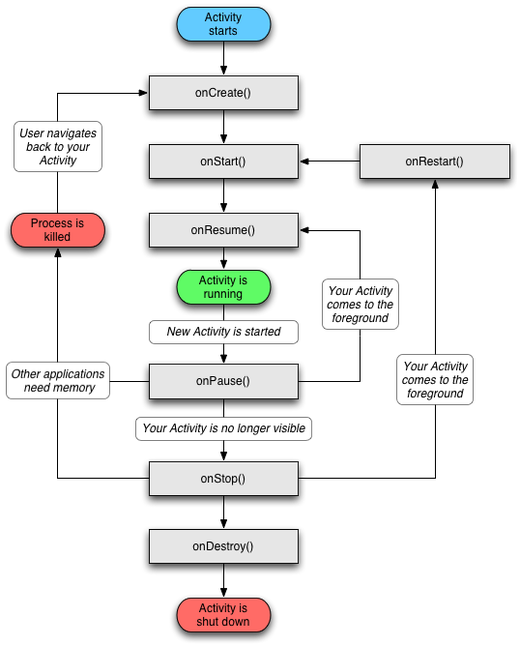
A key object in the Android world is the "Activity". Each visible "screen" in android
is an activity. The following diagram illustrates the activity life-cycle with key methods.
Just for the record, a vital link:
Up to the final day of the final unit has all been setup for:
This is where thing get interesting (beyond just cut and paste exercises with Eclipse to set up his game framework. He provides a zip file with two directories. The directory "assets" contains a bunch of PNG images that go into the projects "assets" directory. The directory "raw" contains one file, which goes to res/raw/map1.txt. I copy these into the proper directories, then in Eclipse I type File --> Refresh. Note that it would be possible to rename the entire project using eclipse Refactor --> Rename, but I am leaving it as AndroidGame. In "src", right alongside of com.trebisky.framework I create the package: com.trebisky.robotgame. In this package I create the following classes as provided by the tutorial:To port the plain java code to Android:
After all of this, there are 4 java warnings, so it looks ready to go. He provides a game icon image (icon.png 150x150 pixel), which goes into the res/drawable-hdpi directory. Again I do File->Refresh in eclipse after copying it there.
He warns that I may get an error with R.raw.map1, I may need to change the line: import android.R; to import com.trebisky.robotgame.R; .
I do get this error in SampleGame.java. I don't have either line, but when I add this line the import line itself gives me an error. Using Control-Shift-O suggests the following fix (which works):
import com.trebisky.androidgame.R;
Also in GameScreen.java, the following line gives me an error:
TouchEvent event = touchEvents.get(i);This can be fixed by adding a cast:
TouchEvent event = (TouchEvent) touchEvents.get(i);
Now we edit the AndroidManifest.xml file. We add three "uses-permission tags. And we specify the one and only activity in the game, ".SampleGame", but I copy and paste the entire application tag (which includes the activity tag, which in turn includes and intent-filter).
At this point I can load the game into the Xoom, but I immediately get a popup telling me that the game has stopped. On a hunch, I use File --> Refactor on the com.trebisky.robotgame package, changing it to com.trebisky.androidgame -- and now it runs!! The clue on this was the need for this change on the import line above. And I had the project named AndroidGame, but the package named RobotGame.
Here is the game.apk.
After putting the game on my own website (at the link above), I encounter two obstacles when trying to install it on my Xoom. First I need to go into settings and enable the installation of applications from "unknown sources", i.e. other than Google Play. Next, when I go to install it, I find it is in conflict with some previous application called "RobotGame" with a different signature, and the Xoom refuses to install it.
The deal is that when I ran the application via eclipse to test it, it actually did get installed on the Xoom. It is this previous install (with some key generated by eclipse) that I am in conflict with. This brings up the subject of some Xoom basics:
Now I am reading chapter 3 in the OReilly "Android Programming" book. This is a very good book, unlike other computer book publishers, OReilly seems to have a good editing staff that cleans up a lot of rough spots that show up in other books that seem published raw from the author. Chapter 2 (Java for Android) is superb.
This book strenuously recommends NOT doing what I have done, namely using the eclipse that ships with Fedora. I am hoping that this won't be an issue in my one user system. Android likes to set up layouts using XML. This is a way of separating code from layout (but you can ignore this and generate your layout from code, not that it is a good idea). ADT provides both layout editors and manifest editors, so you do not have to hack on XML directly (though you can).
Some Java tips:
Some Android tips:
msgToServer.post(new Runnable() {
    public void run() {
	msgToServer.setText("your text here");
    }
}
After some study, I realize that this is not fully valid code, but it does
illustrate a general concept, namely using a handler and a message queue to
cause another thread to run something. Correct code would be closer to:
// set up fields in main Activity:
Handler h = new Handler ();
// later, in some other thread:
h.post(new Runnable() {
    public void run() {
    	do_something();
    }
)};
The key to the above is understanding the handler class (which I am already using without
fully understanding it), and nothing beats reading this:
It turns out that each thread has a message queue and an instance of the Handler class is related to
some threads message queue (namely the thread that creates the Handler).
The queue is used to hold two things: Message objects and Runnable objects.
And the queue is used for two purposes: holding things to be done some time in the future,
and holding things that one thread is asking another to do.
The following is a very good description of different ways to implement listeners (such as methods to respond to button clicks):
// Set these up a fields in the main Activity
Handler h = new Handler ();
Runnable r = new Runnable() {
   @Override
   public void run() {
	 do_something ();
	 // tail recursion
	 h.postDelayed(this, 500);
   }
}
// Then do this in the onCreate() method
h.postDelayed(run, 0);
And here is another way:
// Set up fields in the main Activity
final Handler h = new Handler(new Callback() {
        @Override
        public boolean handleMessage(Message msg) {
	    do_something ();
	    return false;
        }
});
// a class within the main Activity
class tickTask extends TimerTask {
        @Override
        public void run() {
            h.sendEmptyMessage(0);
        }
};
// in the onCreate method
timer = new Timer();
timer.schedule(new tickTask(), 0,500);
This is a way to schedule a UI update on a timer:
// a class within the main Activity
class uiTask extends TimerTask {
        @Override
        public void run() {
            main.this.runOnUiThread( new Runnable() {
                @Override
                public void run() {
		   do_some_ui_update();
		   // something like the following
		   // tt.setText("yada yada");
                }
            });
        }
};
// in the onCreate method
timer = new Timer();
timer.schedule(new uiTask(), 0,500);
Here is a whole article on ways to do this kind of thing:
I changed my counting demo to use a timer, timer.schedule, and a TimerTask that does a post of a Runnable
to a method-less handler and feel better about everything.
This nails the first two things on my list above.
A bigger font size seems to be an easy thing. It can be changed in the XML layout with android:textSize = "50sp", or at run time via: tt.setTextSize(size).
I can get rid of the title by putting this in the onCreate() method:
requestWindowFeature(Window.FEATURE_NO_TITLE);Another way to do this is to add this line to the AndroidManifest.xml
android:theme="@android:style/Theme.NoTitleBar.Fullscreen"Now, the question is how to keep this thing from being ridiculously full screen. One suggestions is that the top level window should specify WRAP_CONTENT rather than MATCH_PARENT, which sounds great, but doesn't do the trick. The whole business of layout is confusing and after getting nowhere with this, I am going to postpone a further study and move on to GPS device access.
<uses-permission android:name="android.permission.ACCESS_FINE_LOCATION"/>This seems to do the trick. One fellow had posted some misleading information that an Android Security policy was that an application could not obtain GPS updates unless that was enabled in a UI callback. I have not found that to be true (there is a user setting that must be enabled). Pretty doggone easy to do this.
I have a little micro SD to USB holder that I put the card in and plug it into my linux development computer. I copy three small files onto the card (keeping whatever filesystem the SD card shipped with). The files are named "cat, dog, and rat". Then I turn off the Xoom and carefully insert the card into the SD slot. I have been warned that if a person is clumsy and inattentive doing this that the card can just slip into the bowels of the Xoom. I avoid this.
The word is that FAT32 is the way to go on the SD card. The card I have (as shipped) mounts as:
/dev/sdb1 on /run/media/tom/3162-6436 type vfatThe mount as VFAT is probably not good. To reformat this to FAT32 on a windows 7 machine, get to a command window and do:
Format /fs:FAT32 driveletter:Also, here is a link to an SD card formatter than people have used to rescue screwed up SD cards (runs on windows or mac only): On linux, to reformat it FAT32, I do:
su
umount /dev/sdb1
mkdosfs -F 32 -I /dev/sdb1
After doing this and putting my 3 files back on the card, things are no better than before. Linux mounts a FAT32 filesystem, but shows it as VFAT, so that is a red herring. The Xoom does see the card (I can tell by looking under Settings --> Storage), but so far ES File Explorer does not seem to see it. Incidentally in ES File Explorers world view, /sdcard is the internal flash memory, which actually turns out to be misleading and bogus.
I download the android app "File Manager HD" and click on "Storage" and I am immediately looking at the contents of my external SD card with my 3 files front and center! Apparently ES File Manager is just clueless about the SD slot. The lower right corner of the screen shows "/storage/sdcard1" --- I will bet you that the internal card is /storage/sdcard0. Now we are getting somewhere.
Folks say that with a USB cable, they can plug the Xoom into a PC running windows and transfer files to the SD card slot. This does not work with my linux machine. At least I cannot just plug it in and see it pop up like a USB memory stick would. Some people say that the following will accomplish this under linux:
yum install mtpfs
mkdir /mnt/xoom
mtpfs -o allow_other /mnt/xoom
Here is a good link: Apparently as of Android 4.0, Google switched from USB mass storage protocol to "MTP" (which is "Media Transfer Protocol"), which is not yet integrated into the linux kernel.
Indeed mtpfs works on my Fedora 18 system. With no arguments it detects the Xoom, but then tells me to specify a mount point. Once I give it a mount point I can do:
mtpfs -o allow_other /mnt/xoom
Listing raw device(s)
Device 0 (VID=22b8 and PID=70a9) is a Motorola Xoom (MTP+ADB).
   Found 1 device(s):
   Motorola: Xoom (MTP+ADB) (22b8:70a9) @ bus 1, dev 12
Attempting to connect device
Android device detected, assigning default bug flags
Listing File Information on Device with name: (NULL)

 ls -l /mnt/xoom
 total 0
 drwxrwxrwx 2 tom tom 0 Dec 31  1969 Internal storage
 drwxrwxrwx 2 tom tom 0 Dec 31  1969 Playlists
 drwxrwxrwx 2 tom tom 0 Dec 31  1969 SD card

 ls -l /mnt/xoom/SD\ card/
 total 2
 -rwxrwxrwx 1 tom tom 4 Mar  9 15:21 cat
 -rwxrwxrwx 1 tom tom 4 Mar  9 15:21 dog
 drwxrwxrwx 2 tom tom 0 Dec 31  1969 LOST.DIR
 -rwxrwxrwx 1 tom tom 4 Mar  9 15:21 rat
Note that the mount command shows the mounted device:
mtpfs on /mnt/xoom type fuse.mtpfs (rw,nosuid,nodev,relatime,user_id=0,group_id=0,allow_other)To unmount it:
su
umount /mnt/xoom
String sd_base = Environment.getExternalStorageDirectory().getAbsolutePath();
This returns "/storage/sdcard0", which is almost right. The double talk from Google on this is: "don't be confused by the word 'external' here. This directory can better be thought as media/shared storage... In devices with multiple 'external' storage directories... , this directory represents the 'primary' external storage that the user will interact with."
All this is well and good (sorta), except there is no standard Environment setting to interrogate to get the honest and for real external storage, so I just have to hard-wire it as /storage/sdcard0. This works, but is hardly ideal. The reason for this subterfuge would seem to be that for a long time there was no support for the external SD slot, so they set things up so that applications that were trying to access external storage would find something (the built in flash card). Now that support for the external card has been implemented, they just don't want to change this, or something.
To scan the directory on the SD card, this works:
File sd_file = new File ( "/storage/sdcard1" );
File [] file_list = sd_file.listFiles();
int n = file_list.length;
String fname = file_list[0].getName();
And by 7PM, we are at somewhat of a milestone, having accomplished several things today:
The file "sabino.jpg" makes it there, but the attempt to copy the tpq files just silently fails. Weird. Nothing to be done besides prying the SD card out and seeing if we can get the map files into the Xoom that way. (Planning ahead for some anticipated testing in Phase 2). That certainly works (removing the SD cards, placing it into a USB adapter, copying the files, then replacing it in the Xoom).
I am finding that doing Android graphics is entirely its own game, and none of the material in my Java books (which deal mostly with "AWT", and maybe also with "Swing") are of any help. A great article is the 2-D Graphics guide from Google:
Note that Android offers a View and a SurfaceView class as starting points for the design of custom Views (an Android application layout is a composite of one or more views). However, the guide just referenced above states that an application like a video game should not use a view, but should write directly to a Canvas. This is duly noted, but a couple of comments about views are worth making before abandoing them altogether. The "View" class is a lightweight and simple approach to setting up a custom view. the "SurfaceView" class is more sophisticated. In particular it can be updated from a background thread, unlike a "View" which can only be updated from the UI thread.Also worth noting is that Android supports access to OpenGL for games, animation, and high performance graphics.
When I did the game tutorial, it was easy to display a graphic file (in that case a PNG). The tutorial was (before porting to android) a Java applet. An applet has a collection of methods:
Image img = getImage ( getCodeBase(), "dingus.png" );
Image img = getImage("http://www.myschool.edu/anImage.gif");
Then in the paint method, I display the image via:
g.drawImage ( myimage, x, y, this );And that gets the job done for an applet. For an application, the image (this is java.awt) would be read via:
Toolkit = Toolkit.getDefaultToolkit();
Image img = Toolkit.getDefaultToolkit().getImage(URL or file path);
On Android, something like this is required to get an image from a file
File imgFile = new  File("/sdcard/Images/test_image.jpg");
if ( imgFile.exists() ) {
    Bitmap myBitmap = BitmapFactory.decodeFile(imgFile.getAbsolutePath());
    ImageView myImage = (ImageView) findViewById(R.id.imageviewTest);
    myImage.setImageBitmap(myBitmap);
}
Another way (which does the bitmap decoding implicitly):
File imgFile = new  File("/sdcard/Images/test_image.jpg");
if(imgFile.exists()) {
    ImageView myImage = new ImageView(this);
    myImage.setImageURI(Uri.fromFile(imgFile));
}
Then to draw this image, you need a canvas and do something like this:
Canvas canvas = new Canvas();
canvas.drawBitmap(bitmap, yPos, xPos, null);
The trick here is that the canvas needs to belong to something (like a View), so the best way to get the canvas is to set up a class that is a subclass of View and override the onDraw method like this:
public class myView extends View {

    public myView(Context context, AttributeSet attrs, int defStyle) {
        super(context, attrs, defStyle);

    }
    public myView(Context context) { this(context,null,0); }
    public myView(Context context, AttributeSet attrs) { this(context, attrs,0); }

    @Override
    public void onDraw(Canvas canvas)
    {
        super.onDraw(canvas);
	// do your drawing code in here
    }
}
This view gets made part of some layout, the layout gets inflated, and you have a
canvas to draw on.
Here is some other code:
setContentView(R.layout.main);
Bitmap bitmap = BitmapFactory.decodeFile("/sdcard/sample-1.jpg");
ImageView jpgView = (ImageView)findViewById(R.id.imageView);
jpgView.setImageBitmap(bitmap);
An entirely different approach is to use a Drawable.
A nice tutorial on drawables is here:
A quick one line way to convert a file into a drawable is:
Drawable d = Drawable.createFromPath(imagePath)As near as I can tell at this stage, drawables are a predigested cached resource (kept in the "res/drawable" subdirectory).
This delete binding is an eclipse thing. It can be changed. Window --> Preferences --> General --> Keys Then I click on the "Bindings" column to get it to sort, scroll down to "Delete Line" and click the "Unbind Command". While I am there I also unbind Control-F and Control-U and Control-B. Control-B could have been a nice shortcut (for build project), but it says "In Windows", so I guess I am not giving up anything. I hit "apply" and "OK" and now I can safely scroll up and down using Control-D and Control-U.
String im_file = "/storage/sdcard1/sabino.jpg";
File imgFile = new File ( impath );
Bitmap myBitmap = BitmapFactory.decodeFile(imgFile.getAbsolutePath());
canvas.drawBitmap(myBitmap, 0, 0, null);
But, as the saying goes, the devil is in the details.
One thing I was curious about was how a 7.5 minute quadrangle was going to look
displayed with one to one pixel mapping on the Xoom screen.
The short answer is that it looks fine (I was fearful it might look too dense).
The Xoom screen is 160 dpi with 1280 by 800 pixels (on a 10.5 inch diagonal).
In comparison, my desktop screen is a 21 inch diagonal with 1680 by 1050 resolution.
When I display the same image on my desktop screen, it is 14 inches wide
(measured with a tape measure), as compared to 8.5 inches on the Xoom.
Although they quote the Xoom as 160 dpi, I calculate 1280/8.5 = 150.6 dpi.
By comparison my desktop display gives 1280/14 = 91 dpi.
DDMS (Dalvik Debug Monitor Server ) is a tool I have meant to learn more about.
It is integrated into eclipse (but can also be run from the command line).
I have found that it lets me browse the filesystem nicely on the Xoom, and
does not seem limited by the usual Android sandboxing.
First of all, I find I am missing the all important "Devices" tab, which
I can get back via eclipse doing this:
This, as you can imagine, helps a lot.
Another tip is to ensure that the application manifest includes
the line:
I had ideas about using the seek method in RandomAccessFile to maneuver around the file,
reading the header and index (this worked fine). I then tried handing the FileDescriptor
to BitmapFactory.decodeFileDescriptor, but it kept returning null. Then we read the
JPEG image bytes into a byte array, and passed this to BitmapFactory.decodeByteArray.
This worked.
Just for the record, once the bitmap is displayed, it would seem to be
a good idea to make the following call:
Now some mundane screen issues are coming to the foreground:
After Alan left, the program was displaying a single tile from one map file. I got to work on
the code to read the header and index from the TPQ file, and soon had it cycling through tiles
displaying one after the other with a 2 second delay. And I modified the onDraw routine to ask
for the canvas size and center the tile -- just doing this allow things to work properly when
the tablet is rotated from portrait to landscape. Not need to catch the SizeChanged() event.
As a last step I added code that entered the longitude and latitude for Tucson and fetched the
proper tile from the US map, centering the tile (leaving centering on an exact coordinate as
an easy task for the future). This was fairly easy and adds code that uses information from
the image header and knows how the use the index to find a tile of interest.
One thing I am punting on now, but will need to be solved is how to read a double (64-bit)
floating point value from the TPQ file (in back-assward byte order) and get its bytes flipped
around and acting like a proper float for Java. This is a fairly easy thing to solve in C,
but Javas strict typing fights me tooth and nail.
I do see in the LogCat window that every 2 seconds now Java is doing garbage collection.
I don't know if this is symptomatic of my beginning to push memory limits.
I hope not.
But I can blame the author (Reto Meier) for the following outrage, namely the
hitting me over the head with the "best practices" stick. Any groundless appeal
to some nameless authority (in lieu of a discussion of why doing something or other
is a good thing) is reminiscent of "you are really gonna get a whoopin' when your
daddy gets home" and such like. When I hear "best practices", I am immediately
eager to jump up and demonstrate how I can do a better job while flying in the
face of such admonishments.
I don't like people telling me what to do either.
And since this is a significant milestone, it is appropriate to put the
code up here:
The size (in pixels) of maplets within a TPQ file seem to be constant,
but different TPQ files at the same level may be different.
For example the O'Neill Hills quadrangle (q32113a3.tpq) has
all 436 by 256 pixel files.
This quadrangle is in extreme southwest Arizona at latitude 32 north.
For the North Palisade quadrangle (q37118a5.tpq) in central Calfornia
at latitude 37 north, these are all 410 by 256 pixel files.
Note that the height in pixels remains constant, but the width shrinks
as you head north and longitude lins converge.
It is also worth noting that I have only written 663 lines of java code to
do all this (and there is a lot of debug stuff and cruft that could be
preened out of that).
The following note from Google definitely looks worth reading:
Another tip is to add this to the Android Manifest and see what happens:
One tip is to do as much as possible using OpenGL Textures, as they work outside of the application memory limit.
Either than or go with native code (the NDK). I also wonder about setting up some kind of android helper process
to cache maps for me (if it could run as a separate 256M limited process). If I was to rig something like this up
it would be good to design it so several of these could be running -- in case I wanted to use this scheme on devices
with less than a 256M limit.
Last but not least, a quick look at the second link above (getting started with the NDK) makes it clear
that using the NDK to include C code in a project is really pretty straightforward and simple.
I found the following tidbit (from the second link above) quite instructive:
The huge wart on this otherwise superb tablet is the lack of an SD card slot.
This is apparently an "attitude thing" on the part of Google. Here are some
quotes:
I for one, am not at all confused.
This kind of stupid "we know best" attitude, coupled with an unwillingness
to listen to users (they know everbody likes the idea of an SD card) will
and should spell trouble for them. It is a total showstopper for what I want to do.
I might be interested if they offered 64G of internal storage like the Asus
TF700, but they don't. 2G of ram is a nice touch though.
This is "what the Asus Prime should have been", althouugh the battery life is not
as good as the Asus Transformer Prime TF201. Asus claims an 8.5 hour battery life,
and testers seem to agree (this would be fine by me). A proprietary USB connector
is an irritation.
It is time to put all the maps on the sdcard and make
a final decision on a file layout. I have decided to make
things as simple as possible for the android application.
This is in contrast to my philosophy for gtopo, where I
put images of the original CD's verbatim on my hard drive
and made the application deal with their directory structure
and file names. In the new scheme of things:
Work got interrupted when I discovered that my computer at my office was down
with serious hardware problems. As it turned out this old AMD socket 939 motherboard,
which has been in service for 8 years died today. Its demise was because a plastic
rivet holding a heat sink on the motherboard chipset popped loose, the heatsink
slipped out of position, and the chip incinerated itself. A stupid way for a
computer to die (and the guys in the computer shop say that this is well known and
common on AMD motherboards of that era). Of course it is tricky to buy a
replacement motherboard (well, actually there are lots on Ebay), so it was time
for an upgrade. So now my office computer (which hosts this website) has an Intel
i7-3770 (which gives it 8 cores at 3.5 Ghz) and 32G of ram, a significant upgrade.
As for the files on the SD card, the more I think about it, the more I like the
simple and clean file setup. I am relying on the filesystem to find files for
me quickly from within a directory of 12,000 files - so I hope whoever wrote the
filesystem code thought of that and did things right. Doing it this way will
certainly make my code much simpler and cleaner than all the crazy things I dealt
with in the gtopo program.
On that vein, I am thinking seriously of reorganizing the way gtopo handles files
to use the same setup. What I would like to do is to use my "walk" script to load
one CD of files at a time into the new simple directory structure. So a gtopo user
would have to load his CD's one at a time, running "walk" (maybe renamed to something
like "topo_loader") on each CD. This scheme (which would require little or no changes
to the script), would easily allow a new state to be purchased and added to a setup.
And it would not be hard to write additional scripts to select files from an existing
collection (probably by specifying a rectangle bounded by latitude and longitude.
It is easy enough to to fix 2-byte (short) and 4-byte (int) integers, but 8-byte
doubles so far are perplexing me. This is easy enough to do in C, and actually
rearranging a byte array or 8-byte (long) java integer is no real challenge.
The trick is convincing the java strong typing that the value is now actually a
double. It looks like there is help in the class Double, which offers the following
method:
A look at /var/log/yum.log shows (from the wee hours this morning):
As an aside, while researching this, I came across the following link,
which is a summary of what I have already worked my way through to get to this
point. If you have made it to here, you are probably well beyond needing this
information also:
Instead, what I do is to check the copy of eclipse that I got as part of
the ADT bundle, and indeed it is alive and well and talking to my Xoom.
What it is missing is the Vi wrapper plugin.
To install the Vrapper plugin into the ADT bundle copy of eclipse, I need to do:
I install the PyDev package, and then go back and install all of
the Vrapper packages. What I probably should have done is to just
uncheck the Python vi extension and avoid the whole PyDev thing.
Whatever the case, Vrapper acts like it installs OK, but I do not get the familiar
"V" icon on the toolbar, and vi mode is definitely not working in the edit window.
Who knows what this is all about, but I definitely cannot use eclipse without the
Vrapper plugin.
So, it is back to the newly installed Fedora eclipse.
I was going to create my own "eclipse" script that would hide the fedora eclipse and
warn me that I probably want to run the adt version. I may do things the other way
around (which would boil down to nuking my "adt" shortcut).
Installing the ADT plugin in the Fedora eclipse is almost
effortless and takes maybe 2 minutes.
(It is downloading the SDK that takes a lot of time).
Yep, this is/was the thing to do -- if I had only know it, it would have taken
5 minutes to download the ADT plugin and get on with things, not the frustrating
two hours. Maybe the moral of the story is to never exit eclipse.
I notice that the changes I make in eclipse
are not always reflected in the files on disk.
A key thing about this is that eclipse tells me if a
file has not been written to disk by putting a little "*" in the file tab.
I can force a write using the vi command ":w", and there
may be other ways.
Also, eclipse needs to be manhandled a bit before it
recognizes that I have added files behind its back. File --> Refresh along
with collapsing and expanding the file tree eventually seems to do the trick.
And for the future:
A good part of the reorganization is done. This is all work in the Java world
to organize the code. The program now runs for one file on any level, with hard
coded values all eliminated -- it will start up, find a map that shows a lat/long
position at a specified scale and display that map. Using git gives me a feeling
of confidence and is certainly the right thing to do.
The next goal is to display at a given level making the existence of multiple files
transparent. To get there, I am going to have to add a Maplet class to handle and
cache the maplets -- and there should be a separate cache for each level.
And I should also add a file information cache so I never have to reread a file
header (one of these for each level also). Just under 1000 lines of Java at this
point (which is pretty impressive compared to the 6000 lines of C code in gtopo).
This days effort turned into a 15+ hour epic ending at 2AM.
Almost all the work was dealing with Java programming issues.
The Android specific aspects of the project all seem to be well
under control. The program is now much better organized, with
the following classes:
Since my program is often dealing with a pair of coordinates,
it would be handy if functions could return value pairs.
Sadly, Java does not provide a way to return multiple values from
functions as many other languages do.
The only way to do this is to return a two element array
like this:
Adding the gps methods to the Activity class, led to two problems.
One is that my own Location class is now clashing with the library location
class, so I rename mine (using the handy Eclipse "refactor" button) to
MyLocation. The next is that my application now blows up with an exception:
More trouble than expected getting the state/atlas levels to work.
The first trick is that the state level map has edges that do not
start at even multiples of maplet counts computed from zero lat/long,
so that lat/long values need to be offset to values referenced from
the map corner. Then I confirm the value of regression testing.
I go back to test other levels and the 100K level blows up
(but 24K and 500K work fine, which is weird).
After about 5 hours, I have all the levels working.
I am crossing bridges (and falling into open manholes) that I dealt
with years ago when I wrote the gtopo program. In some ways this is
unfortunate and might have been avoided had I tried some kind of rote
translation of the C code. On the other hand, I think it has largely
been beneficial to recode from scratch in Java, refering to the C code
(and my notes) only occasionally for a specific reason.
My biggest irritation with eclipse is that the editor tries to be
too clever. There may be ways to turn off the behaviors I hate.
When I am typing, I do not want any help, thank you very much.
Eclipse gets excited when I type strings or function arguments and makes
me cause typing errors -- either that or I have to hit escape multiple
times to get out of insert mode.
I am going to wear out the escape key on my keyboard by hammering away
on escape to get the Eclipse editor out of the insane insert modes it
decides to go into. Maybe the real vim plugin gadget for Eclipse would
make things better. We could spend all our time figuring out ways to
tame eclipse and never get our project done.
I have discovered that double clicking on tabs makes a given thing
full screen (or returns it back the way it was if it was already
full screen), and this is a great thing.
I do like the syntax checking red dots on the left and red under-wiggles
that indicate mistakes or typos I need to fix. Sometimes these are erroneous
when I have made changes in one tab and not saved yet, which to my surprise I
have found I often have to do manually. One brute force fix is to click on
the "Run" button and see if I get lucky. This does save all tabs that are yet
unsaved before making a final check for problems.
WOW!, this makes things so much better.
Indeed, if you use eclipse for other languages, you will have to fish around
and find the Content Assist setting to disable for their editors.
Sometimes there are settings you set to huge values to make them go away.
I am by no means the only one who hates this nonsense.
Ultimately, I rolled my own "gesture detection" logic, which actually is not too hard.
The first tutorial gave a key piece of advice, a strategy I have employed many time,
namely to write a routine to log motion events, then study the log and discover just
how things work.
Today I spent several hours doing code cleanup (and regression testing at key
points in the reorganization). I did away with the internal "Level_info" class
and reworked the Level class to allow external access only through class methods.
Internally it has an array of Level class instances that it hides and uses.
This is much nicer and cleaner than the previous arrangement. I also eliminated
the MyLocation class entirely, absorbing it into the Level class and adding
a handful of class methods. The Location class was shrinking and was a singleton
anyway, supporting only the lat/long coordinates of the center and ways to change
the position. Things became simpler and cleaner when these just became global
(static) fields in the Level class.
Doing this now was essential. The ideas would fade from my thinking, and a tangle
of code would remain forever.
At this stage I could call the project finished. It is working at the
basic level I had imagined and is quite useful. There are more things
that could be done, but I will no longer be working on this non-stop.
I can tackle these as I have time and energy.
What follows is a checklist of things I should consider doing.
Some (like the OME cache overflow issue) are quite important,
but the program can be lived with (I can always restart it if I
run it out of memory).
This was a bigger project than I had expected. There were several
big learning curves in parallel. Eclipse itself was one, Java another,
and the Android world yet another. I have almost come to like Eclipse
now that I have the vi editor plugin in place and settings adjusted so
it doesn't get in my way all the time. If I could get focus to follow
the mouse instead of the idiotic business of having to click in a
subwindow before I can type in it, I would be really happy. This should
be an Eclipse preference option. I have actually enjoyed Java, but I
will have to say that it should be obvious to everyone that writing a
big program (Eclipse itself being the case in point), is a bad idea due
to performance issues. Eclipse is terribly slow, and it has bugs that
are inexcusable for a package that has been around so long and ought
to be quite mature. Android is actually a fun and interesting environment
with lots of possibilities.
Phase 2 Checklist
DDMS and other debugging aids
Since I am pausing to collect my thoughts, I seemed like a great time to
learn about some of the debugging tools I have been hearing things about
while researching other problems.
Window --> Show View --> Other --> Android --> Devices
android:debuggable="true"
LogCat
This is something else entirely. The android logs all kinds of messages,
and you can pull these out of the device and analyze them, which can be
very useful. Here is a tutorial:
An application can write into the log via methods in android.util.Log.
The following methods write warnings and errors respectively.
(There are also v, d, i methods, this sure looks like linux syslog).
In general on the Android output to stdout and stderr is redirected to /dev/null,
so writing to System.out.println just vanishes in the general case.
However, it may be that under eclipse, this gets redirected to Logcat.
Eclipse does have a console, but everyone seems to say that it does nothing
for Android development and is disabled. However there is something else that
may be incredibly useful:
Window - Show View - Debug - Display
Is supposed to bring up a debug console, but this menu path does not exist for me.
There is a whole 'nuther debug perspective I just found. This has much cleaner displays
of the log and has a Breakpoint tab that hints that someday I can figure out how to set
breakpoints and inspect java variables and such.
Monday 3-11-2013
My friend Alan Koski came by the morning, and we spent a lot of time talking about
strategic aspects of the android topo map project (in particular about how the files
on disk should be organized), then we dove in for a tandem programming session.
By the time we were done we had the code written and working to read a TPQ file
and display one of the tiles.
bitmap.recycle();
Also to get the size of the bitmap:
bitmap.getWidth();
bitmap.getHeight();
Orientation Changes
This may need to be added to the android manifest:
And then this method in the activity should be overriden:
     @Override
     public void onConfigurationChanged(Configuration newConfig)
     {
	 if (getResources().getConfiguration().orientation == Configuration.ORIENTATION_LANDSCAPE) {
	    //do your task
	 } else if (getResources().getConfiguration().orientation == Configuration.ORIENTATION_PORTRAIT) {
	    //do your task
	 }
	 super.onConfigurationChanged(newConfig);
     }
Also see this documentation on the OrientationEventListener abstract class:
Canvas size (and changes)
You can ask for the canvas size via:
canvas.centerX();
canvas.centerY()
Or you can try:
canvas.getWidth();
canvas.getHeight();
Alternately, in the onDraw method, try:
this.getWidth();
this.getHeight();
Another thing you can do is to override the onSizeChanged() method
in your class that extends View, then save the size info and use it
in the onDraw method:
    @Override
    protected void onSizeChanged(int w, int h, int oldw, int oldh) {
        this.w = w;
        this.h = h;
        super.onSizeChanged(w, h, oldw, oldh);
    }
This has a good discussion:
I find I can use the values of canvas.getWidth/getHeight in the onDraw method just fine to calculate
what I need to center my image (and because I am drawing in the onDraw method, I am asked to redraw
the screen whenever the device rotates, so I don't actually need to respond to the orientation event.
Tuesday 3-12-2013
Back at it, working on getting tiles surrounding just the center tile showing Tucson exposed.
After some substantial code reorganization, I got this working. I have previously thought
that I could not call FileIO and BitFactory routines from the onDraw method, but I was entirely
wrong. I have been able to verify that I am getting exactly the canvas width and height.
Also I have been pleased to find that when I draw a bitmap that hangs over the edges of the
canvas, it does the right thing for me, clipping it off.
"Best Practices" and other nonsense
I am in a mood (for some reason) to grind some axes, so here goes.
The only thing that irritates me more than a book that includes the word
"professional" in the title is a book that calls itself a "bible".
Well actually there might be something every bit as irritating, and that
is a book that insults me by calling me a "dummy" (please, call me a
professional or expert or something else instead, and don't expect my business).
I figure that if you call something you write a "bible", that God is likely
to send a dog to pee on your leg, ... or something. Of coure it isn't the
author that gives these books their titles (who knows what the author actually
intended to call them), but some marketing dork. Perhaps God sends the dogs
looking for those people.
Anyway, enough said.
Full screen display from a TPQ map
Things are at another milestone. I can now fill the whole screen with a display
from a TPQ file, centered at a location specified by latitude and logitude.
I could change to any other TPQ file, or any other location (but have chosen
Tucson on the level 2 map). However, the only way to make such changes is to
change values in the program itself. The next task is to look into how to respond
to user fingers on the screen and move around the map.
TPQ file details
The order of the tiles (maplets) within a TPQ file goes like this:
		 1  2  3  4  5
		 6  7  8  9 10
		11 12 13 14 15
		16 17 18 19 10
		21 22 23 24 25
		26 27 28 29 30
		31 32 33 34 35
		36 37 38 39 40
		41 42 43 44 45
		46 47 48 49 50
This is from a TPQ file representing a 7.5 minute map sheet,
with 50 JPEG files.
There are 5 files east to west
and 10 files north to south.
Android interface events
This is how we respond to the users fingers.
A good general discussion is:
Adding motion via finger touches
It turns out this is pretty easy.
It is all about adding an onTouchEvent() to the view.
Making it slick and smooth is not so easy, ... yet.
But it is workable even if clumsy.
Two things to be done:
Adding the cache made a huge difference, now the motion follows my finger
and is only a little jerky. And a couple of bugs have shown up and gotten
fixed. The java run time array bounds checking and null reference exceptions
and all of that do point a hairy finger at problems.
Phase 3 Checklist
Finishing this list will pretty much make the project fully
usable in the way I originally envisioned. After this, changes
will be performance optimization and addition of not yet anticipated
other features.
More maps - Colorado has arrived
The disks I bought on Amazon Marketplace have arrived.
This adds the 7 disks that now give me Colorado.
So, I now have the six southwest states all on my hard drive
and they take up just under 25G. Unless the FAT32 filesystem
is horribly inefficient, these will all fit neatly on the
SD card in the Android with room to spare.
I also know that not all of that 25G needs to be included
in what I put on the android SD card.
Memory limitations
I had been hearing that there was a 16M memory limit per application.
This limit is device dependent, and can be 24M (or something else),
depending on the device -- these articles discuss this:
The first fellow carps that this limit is silly on a device with 512M,
so it is certainly even more silly on my Xoom with 1024M.
He also says that what will happen is that an OOM (out of memory)
exception will blow my application out of the water -- unless I catch it and do something
like flush out older entries from my bitmap cache -- which is exactly what I would do.
Log.w ( TAG, "memory limit: " + Runtime.getRuntime().maxMemory() );
I get: 50,331,648 bytes.
This is 48M (48 * 1024 * 1024), which is more generout than the 16 or 24M that
I was told to expect. But when you consider that there is 1024M of RAM on the
Xoom and that this is about 5 percent of total RAM, it is pretty frustrating.
android:largeHeap="true"
This goes in the application section, see:
After setting this option, I see that Runtime.getRuntime().maxMemory() returns 268,435,456, which
is 256M -- a whole lot better (but I would prefer 512M).
So how does the NDK work on the emulator?
The emulator is running a true virtual machine,
including full processor emulation.
And yes, that means when running Java within the emulator
you are running a VM inside a VM.
If this doesn't explain why the emulator is so terribly slow, I don't know what does.
Wednesday 3-13-2013
What about new android tablets
The Motorola Xoom that I know and love is now more or less obsolete.
Not a big surprise, tablets are a very fast moving technology.
My Xoom works great, but I am still curious just how fast technology
is moving and what is out there today. Two suggestions have been
offered to me for alternative tablets.
Nexus 10
The Google Nexus 10 with 32G and WiFi only sells for $555 at Amazon.
My advisor Dallan Porter says that this would be his next Android tablet.
The Nexus line is produced by Google (and the 10 indicates the 10 inch
screen size, there are also 7, 4, and "H" versions of the Nexus).
It has a 2560 by 1600 pixel display (aiming at giving Apple iPad's a
run for their money). This gives 300 dpi pixel density.
The processor is from Samsung,
the "Samsung Exynos 5 Dual, Dual-core Cortex-A15 @ 1.7 GHz, Mali-T604 Graphics".
It comes with 2G of ram, and either 16 or 32G of eMMC storage.
The Mali-T604 is a quad core graphics processor.
Has GPS and a standard micro USB port.
Battery Life from a hefty 9Ah battery is in the 7-9 hour range.
The bigger screen needs more juice to light up and makes bigger
demands on the GPU and CPU to redraw it.
Google wants to avoid "techy nonsense left over from the paleolithic era of computing".
...
"Everybody likes the idea of having an SD card,
but in reality it's just confusing for users"
Asus TF700
The Asus TF700T is a 10.1 inch tablet available from Amazon for $540 in March of 2013.
The screen is WUXGA 1920x1200, which is well beyond the Xoom's 1280x800
It has 1G of ram (identical to the Xoom) and 64G of EMMC storage (twice the Xoom).
It is wireless capable (a 4G version is promised), has GPS, and an SD card slot.
Gorilla glass screen, Nvidia Tegra 3 4-Plus-1 CPU.
The cpu clocks at 1.6 Ghz with 2 to 4 cores active.
It will run at 1.7 Ghz single core.
Thursday 3-14-2013
I wrote a small ruby script to extract the files,
place them where I want, and perform the renaming. Mapping
the letters k to c and q to n allowed the identification and
elimination of some duplicate maps along state boundaries. After the
smoke cleared from running this I had:
The map files for 7.5 minute maps now have names like n32115a1.tpq
The letter "a" runs a-h from south to north.
The number 1 in "a1" runs from 1-8 from east to west
I discovered that some states (on later releases) include the single "G"
file with 4 maplets (2x2) in the 1x1 degree "section" directories.
The following command demonstrated that it is identical to the file
in the SI_D01 directory, so it doesn't matter which one my script picked up.
cmp /u1/topo/co_d04/d39105/g39105a1.tpq /u1/topo/SI_D01/US_NW/B35105/D39105/G39105A1.tpq
It took quite a while to copy all the files to the SD card, but it went without
a hitch and seems to work just fine when plugged back into the Xoom.
Now I have all of the maps for the 6 states on the SD card.
Note that being able to hold all of the maps in 20G, makes it completely
thinkable to put them on internal storage in a device which has only 32G of flash total,
though I much prefer to have them on an SD card.
Friday 3-15-2013
Endian issues
The TPQ files are binary files. They have a header with a variety of interesting
and useful information. This information is stored as binary value, in little endian
(back-assward) byte order, a throwback to the days of 8 bit processors. The trick
is to read a binary value into Java and then transform it to big endian (which from
everything I have read is a Java standard). You would think there would be a class
to simply do this, but I have not found it yet.
long lval;
double dval = Double.longBitstoDouble ( lval );
Also consider the code given in this link:
Also note that there is a Long class that includes Long.reverseBytes ( lval );.
There are also Integer.reverseBytes ( ival ); and Short.reverseBytes( sval );.
Eclipse has lost the Android ADT
For the entire past week I have been working in the same instance of eclipse, never restarting it.
But it was necessary to reboot my machine, and of course restart eclipse.
The first symptom of troubles were that I could not launch my Android application.
It either complains about nothing to start as/on a server or tries to launch something else
as a Java applet. And when I try to do a New --> create android project, the options to do so
are no longer in the menu.
Mar 15 03:42:27 Updated: 1:eclipse-platform-4.2.2-4.fc18.x86_64
Digging back earlier in these notes, I see that I started with eclipse 4.2.1
So indeed, it looks like an automatic fedora upgrade has wiped out my ADT plugin.
Oddly though, the Vrapper plugin is still there.
It would seem that I have stumbled into the ugly fallout of an issue I was warned about,
namely the hazards of running an Eclipse that I installed from my own systems package management
system (namely fedora yum/rpm). On page 6 of the "Programming Android" book from O'Reilly is
a statement I had noticed and worried about:
We really mean it about installing Eclipse in your home folder. ....
Do not use your system's package manager. ....
Eclipse plug-ins and updates are managed separately from other software
in your system.
I suppose at this point I could repeat the exercise of installing the ADT in the newly
installed instance of Eclipse.
(And in fact this is exactly the right thing to do, see below.)
After that it might be a good idea to disable yum from doing any automatic
ugrades of eclipse. Other eclipse updates will come along that will put me
in this same spot all over again, and when I least expect them.
It gets in a snit because it needs something called PyDev.
It is installed in the same way, but via http://pydev.org/updates
Show a map at a given coordinate
The game now is to simply give a latitude and longitude and have it find the proper
file and then display that location centered on the screen. The main issue
here is to start with long,lat and generate a name like n36112b2.tpq.
This was only an hour or two to get working (after some other tinkering).
Set up a GIT repository.
I have already put a lot of work in while having only one copy of my source files.
I have put a couple of significant checkpoints up on the web server that hosts
this "essay", but now I am ready to do some significant reorganization (the OO
pundits would perhaps call it "refactoring" just to confuse the innocent.
And it should not be too much trouble to put the project under version control.
I could use my old friend SVN, but I am tempted to add yet another learning
curve to this and use GIT (which I am somewhat familiar with).
cd /u1/repo (on my remote server)
mkdir atopo.git (I will call the project "atopo"
cd atopo.git
git --bare init
That gives me an empty bare repository.
Now under eclipse I do this:
New --> Project --> Android Application Project
call it "atopo"  (com.trebisky.atopo)
I make the icon text "Topo" and create an empty new project.
I delete the default layout (don't need it).
cd /home/tom/Android/atopo
git init
create .gitignore with "bin" the only line
git add .
git commit -m "initial project"
git remote add origin cholla.mmto.org:/u1/Repo/atopo.git
git push origin master
This has me "bootstrapped" with Git. Now to add my two Java files,
hack the Android Manifest XML and commit those changes:
Edit the files
git add .
git commit
git push origin master
The preceding three commands are the guts of what I am going to be doing
to keep my project under git. I only need to push when I want to shove
my changes over the network (make my remote repository match my local repository).
Saturday 3-16-2013
Phase 4 Checklist
All the items in phase3 are not done, but it has been long enough since
composing the phase3 to want to reexamine where I am and reevaluate the
items in that list.
Having the project under GIT makes me feel fairly fearless about diving into
serious code reorganization. Location and Level classes will be the
first things to add.
The Level class is still awkward, and needs some additional work.
At this time it contains an internal class "levelInfo" and an array
of these info classes, one per level. What I should probably do is
to make most of what is in the Level class now to be class methods,
then make the info classes instances of what I would then call "Level".
This needs some thought and cleanup, otherwise I am pretty happy
with the structure of the program.
public static int[] something(){
    int number1 = 1;
    int number2 = 2;
    return new int[] {number1, number2};
}

// Main class code
public static void main(String[] args) {
  int[] ret = something();
  System.out.println(ret[0] + ret[1]);
}
Sunday 3-17-2013
Despite this being a busy day with attending church and the
wedding of a good friend, this was a day with some big breakthroughs
on this project. I solved a bug I gave up on at 2AM last night,
and this allows the program to now display 24K scale maps without
being limited by file boundaries. And in what took well under 1 hour,
I added the code to obtain coordinates from the GPS and recenter the
map display on the GPS coordinates.
Provider gps requires ACCESS_FINE_LOCATION permission
The fix for this is to add the following the the Android Manifest XML file:
<uses-permission android:name="android.permission.ACCESS_FINE_LOCATION"></uses-permission>
After this, the GPS functionality of the program is fully up and running.
The program starts displaying the map centered on a location I selected in
the Grand Canyon, but after 10 seconds (the GPS update interval I selected),
the display changes to show me the map centered on my house in Tucson.
Monday 3-18-2013
The goals for today are:
Some eclipse tips and comments
What do you do when you accidentally click on the X on the LogCat
tab and the android syslog console goes away? Hard to get anything
done without it. The trick to bring it back is:
Window --> Show View --> Other --> Android --> LogCat
What could be simpler and more obvious than that?
Turn off Eclipse "content assist"
This goes a long way towards making things better:
Window --> Preferences --> Java --> Editor --> Content Assist
Window --> Preferences --> Java --> Editor --> Typing
Unclick the "auto activation" box for Content Assist. Click Apply and OK.
Unclick all the "automatically close" boxes for Typing. Click OK.
Look in places like:
Window > Preferences > Web > HTML Files > Editor > Content Assist
Switching between levels
Here are some links:
The first tutorial is getting pretty old (circa March, 2010 and Android 2),
but it discusses rolling your own gesture detector by handling
events reported by onTouchEven().
The second discusses some newer android facilities,
in particular the ScaleGestureDetector class.
Tuesday 3-19-2013
Playing with the application this morning, I have for the first time gotten:
AndroidRuntime java.lang.OutOfMemoryError
In a way this is gratifying, because I am for the first time able to use the program
long enough to push it this far. It is somewhat disappointing in that the LruCache
facility is not taking care of things for me -- but I had been warned.
I need to get more involved with LruCache to collect and cleanup items that it has
expired.
Wednesday 3-20-2013
By and large the application is running, and running pretty well. What is lacking is
a way to switch the GPS on and off -- my thought at this point is a keyboard tap
(or double tap) will toggle it. This will require no menu popups and keeps the lean
and clean philosophy of the application so far.
Thursday 3-21-2013
Implemented the ability to toggle to GPS by tapping on the screen.
Friday 3-22-2013
Just tapping the screen once is too easy to do accidentally.
It would be better to have a double tap toggle the GPS, so I dive in
and make this change. This requires getting timer events involved
with the tap events, but by noon this is working to my satisfaction.
TODO
Here are some things I want to be sure not to forget to do:
Another place is at the 31.75 latitude line on the 24K scale (I think I fixed this
in the C gtopo program in some hard wired way).
Feedback? Questions?
Drop me a line!h
Gtopo / tom@mmto.org